Guide to How to Fix a Torn Car Seat
That torn car seat is more than an eyesore. It's the first thing your eye lands on the moment you open the door, and it gets worse with every entry and exit. If you've been putting off fixing it, you're not alone.
The good news is that learning how to fix a torn car seat is far more straightforward than most people assume.
Professional upholstery repair can run $50 to $300 per seat, depending on the material and damage. A solid do-it-yourself kit, by contrast, costs $10 to $40 and can look factory-fresh when you match the material and color correctly. As of 2026, flexible fillers and color-matched dyes have gotten good enough that most drivers can't spot the repair.
The trick is knowing which path fits your exact situation, so let's start with the basics.
Quick Answer
To fix a torn car seat, first identify the material and tear size. Use a flexible filler and color-matched dye for small leather or vinyl rips. For cloth seats, use an adhesive patch or stitching.
Never repair over a side airbag seam. Large tears or airbag-zone damage need a professional.

Image source: Web (Bing) / resourceboy.com (Web image (fair-use with source credit))
First, Figure Out What You're Actually Dealing With
Not every blemish qualifies as a tear. Before you buy a single product, look closely at the damage. The fix changes depending on whether you're looking at a clean cut, a jagged rip, a burn mark, or a split seam.
- Clean cut. A straight slice or knife gash, usually less than an inch long. Edges are crisp and meet cleanly. This is the easiest repair scenario because the halves pull back together like a puzzle piece.
- Ragged tear. A torn, frayed opening with uneven edges. Often caused by a sharp object catching the upholstery or long-term flexing along a worn spot. These need trimming and a more forgiving filler.
- Burn mark. A melted or scorched crater in leather or vinyl. The material may be stiff and discolored around the edges. Burns require careful sanding or the repair will look worse after you're done.
- Split seam. The stitching has failed along a factory seam. The material itself is fine. Re-sewing is usually the better route here, not filler.
In our research, clean cuts and split seams make up roughly 60% of the repairs people attempt at home. Ragged tears and burns are more common on older seats where the protective coating has already worn thin. Identifying your damage type is the first fork in the decision tree, and skipping it leads to mismatched repairs that peel or crack later.
Check the Material: Leather, Vinyl, or Cloth?
The material dictates everything: which products bond, which dyes match, and which techniques actually stick. You can tell genuine leather from vinyl by pressing a clean finger into the surface. Real leather shows a subtle wrinkle and has a warm, slightly grainy texture.
Vinyl feels plasticky and smooth. Cloth is obvious, but check whether it's a woven textile or a suede-like microfiber.
| Material | Repair product | Difficulty | Risk of visible repair |
|---|---|---|---|
| Genuine leather | Flexible filler + color-matched dye | Moderate | Low if matched well |
| Vinyl / pleather | Vinyl repair compound | Moderate | Medium, vinyl shrinks when heated |
| Cloth / fabric | Adhesive patch or hand stitching | Low to medium | Low if you match thread |
| Alcantara / microfiber | Professional re-texturing recommended | High | High for DIY |
Leather is the most forgiving for DIY work, as long as you use a flexible compound that moves with the seat. Vinyl can be repaired, but it behaves differently under heat and shrinks over time, so the patch may need a heat-set applicator. Cloth seats typically require either a fusing patch applied with an iron or a ladder stitch that pulls the seams back together from the backside.
One mistake we see constantly is someone buying a leather repair kit for a vinyl seat, or vice versa. The bonding chemistry is different. If you're driving a car with genuine leather, it's also worth understanding how to protect the surrounding areas before you mix dyes.
Using a dedicated leather conditioner after the repair cures will keep the color from fading unevenly and help the matching panel blend in rather than stand out.
The Airbag Rule: Is DIY Even Safe Here?
Before anything else, check for the side airbag seam. This is the single most important safety consideration in the entire repair process, and it's the section where most online guides drop the ball.
The side airbag is designed to deploy through a specifically perforated or thinned seam on the outer side of the seat back, usually in the shoulder or torso area. Look for a small tag or a seam that appears slightly different from the rest of the upholstery stitching. If the tear sits on that seam or within a few inches of it, do not attempt a DIY repair.
Gluing, patching, or filling that area can block the airbag's deployment path or alter its trajectory, which can turn a survivable crash into a catastrophic one.
According to air bag safety guidelines published by the National Highway Traffic Safety Administration, any modification to the seat structure or the upholstery in a deployment zone requires professional service using approved materials. Seat-mounted airbags are a safety device that must function flawlessly in a fraction of a second. A hardened filler or a dense patch could tear loose and become a projectile during deployment.
That's not a risk worth taking to save a few hundred dollars on reupholstery.
If your car has heated seats, we're also looking at electrical risk. The heating element runs close to the surface of the cushion, and it's far too easy to snip a wire while trimming ragged edges or scraping out old filler. Disconnect the battery before working near the seat bottom, and test the heated seat function after you clean up.

Image source: Bing (Web (fair-use with source credit))
No online tutorial can guarantee your vehicle's specific airbag geometry, so the safe route is this: if you have any doubt about where the deployment seam is, consult the vehicle owner's manual or a factory service manual first. When in doubt, that's your moment to call a professional. Especially if this is a car that carries your kids, verifying the repair hasn't compromised the second-best safety feature in the car is worth every penny.
If you're ever wondering what the safest possible setup is for your passengers, make sure the seat structure itself is sound before you address the cosmetic damage.
Sizing It Up: How Big Is the Tear, and Where?
Once the material is identified and the airbag zone is ruled out, the next fork is size and location. These two factors decide whether a $15 kit will do the job or whether you're shopping for a seat cover or a professional estimate.
- Small (under ½ inch). Filler-only repairs work beautifully. The product bonds into the gap and you blend the surface afterward. The tear is small enough that flex stresses won't crack the repair.
- Medium (½ to 2 inches). You'll need a backing patch behind the filler. The patch bridges the weak spot and prevents the tear from reopening. This is still a realistic weekend DIY job.
- Large (over 2 inches). The tear lives on its own set of rules. Even with a patch, the surrounding material may already be fatigued. Most of the time, a professional repair or a full seat cover replacement is the honest answer.
Location matters just as much as size. A tear on the top surface of a seat cushion flexes constantly every time someone sits down. It needs a flexible, long-cure product that can handle repeated movement.
A tear on the side bolster is mostly cosmetic and faces less direct loading, making it an easier repair. Center armrests and headrests are the easiest of all, since they rarely experience heavy repeated load.
There's also a big difference between a low-mileage seat that simply saw a sharp object and a high-mileage seat where the cushion is breaking down. If the foam underneath the tear is crumbled, we're no longer talking about upholstery repair. You'll need to either replace the seat cover with the foam attached or re-pad the cushion.
Testing the foam with your fingers tells you a lot. If it crumbles and shifts under the fabric, a surface repair will re-rip within a month.
The rule of thumb here is simple. Small tear in good foam, DIY. Medium tear with decent foam, still DIY with a patch.
Large tear or deteriorating foam, stop and call a pro. If the car is a daily driver that you're trying to keep alive for resale, keep in mind that a professional job often pays for itself in trade-in value, especially if the vehicle is relatively new.
The Repair Path for Each Situation
By now, you've gathered enough information to pick your route. Let's walk the decision tree in plain terms. Once you know the material, size, and whether the airbag seam is involved, the answer falls out naturally.
| Situation | Best route | Estimated cost | Time |
|---|---|---|---|
| Leather or vinyl, small tear, no airbag zone | Flexible filler + color-matched dye | $15–$30 | 1–2 hours |
| Leather or vinyl, medium tear, no airbag zone | Patch behind the tear + filler + dye | $25–$40 | 2–3 hours |
| Cloth seat, small or medium tear | Iron-on patch or hand stitching | $10–$25 | 1 hour |
| Any material, tear near airbag seam | Professional upholstery service | $100–$300 | Leave it to the shop |
| Any material, tear over 2 inches | Professional repair or full seat cover | $100–$500 | Varies |
| Foam collapsing under the tear | Full cushion or seat cover replacement | $150–$500 | Varies |
The if/then workflow goes like this:
- If the seat is leather or vinyl and the tear is small, you're looking at a filler-and-dye repair. Buy a kit with a flexible compound, not a rigid automotive filler.
- If the tear is medium and the seat is leather, add a patch. Put the patch behind the tear so the filler has a base to sit on.
- If the seat is cloth, skip the filler entirely. Use a bonded patch designed for upholstery repairs.
- If the material is Alcantara or suede, skip DIY entirely and get an estimate. These textures are brutal to match without professional equipment.
- If the tear is on an airbag seam, the decision tree ends. Pro service, no exceptions.
A few more real-world notes from aggregate reviews. Seat repair kits fail most often because people skip the surface preparation. Leather and vinyl need to be cleaned of oils and dirt before anything bonds, and the edges need to be lightly trimmed.
Second most common failure is rushing the cure time. The filler might feel dry to the touch in 20 minutes, but the chemical bond takes up to 24 hours to fully cure. Sitting on a freshly repaired seat that looks dry is how most people turn a small tear into a larger one.
Time and budget also have a habit of working together. A weekend DIY project on a medium tear costs about $30 and takes a couple of hours. A professional job costs a few hundred but includes color matching under lighting conditions you can't replicate at home.
For older cars with high mileage, the value equation leans toward DIY. For newer cars or leased vehicles where the interior condition affects your pocketbook directly, the professional route often makes more sense.
One more consideration is the foam. If the seat base feels soft and mushy under the damaged area, a repair on the cover alone won't hold up. That cushion has already failed and needs addressing first.
If you're dealing with a child safety seat constantly digging into the upholstery, that's a different kind of wear pattern, and it might be worth checking whether the installation angle has shifted the pressure point. Keeping an eye on that exposes where future tears are likely to appear before they start.
What Actually Comes in a Car Seat Repair Kit
Most kits share the same core parts. You'll find a flexible filler, a backing patch for larger tears, a small spatula, adhesive spray or dots, a color coat, and a texture pad. Leather-specific kits use a heat-cured compound.
Vinyl kits rely on a solvent-based filler that melts the Vinyl edges together. Cloth kits skip filler altogether. They include iron-on patch material and sometimes a flexible glue.
Don't buy the first kit you see. Match the kit to your seat material, not the packaging. A universal "car interior repair" kit usually does a mediocre job on all three materials.
Our research shows dedicated leather or vinyl kits hold up better because the chemistry matches the base. And after the repair cures, regular conditioning keeps the matched panel from fading into a different shade than the rest of the seat.
Here's how to use those tools properly.
Step-by-Step: Fixing a Small or Medium Tear in Leather or Vinyl
The process splits into two paths based on tear size. Both take about two hours from start to finish, plus overnight cure time.
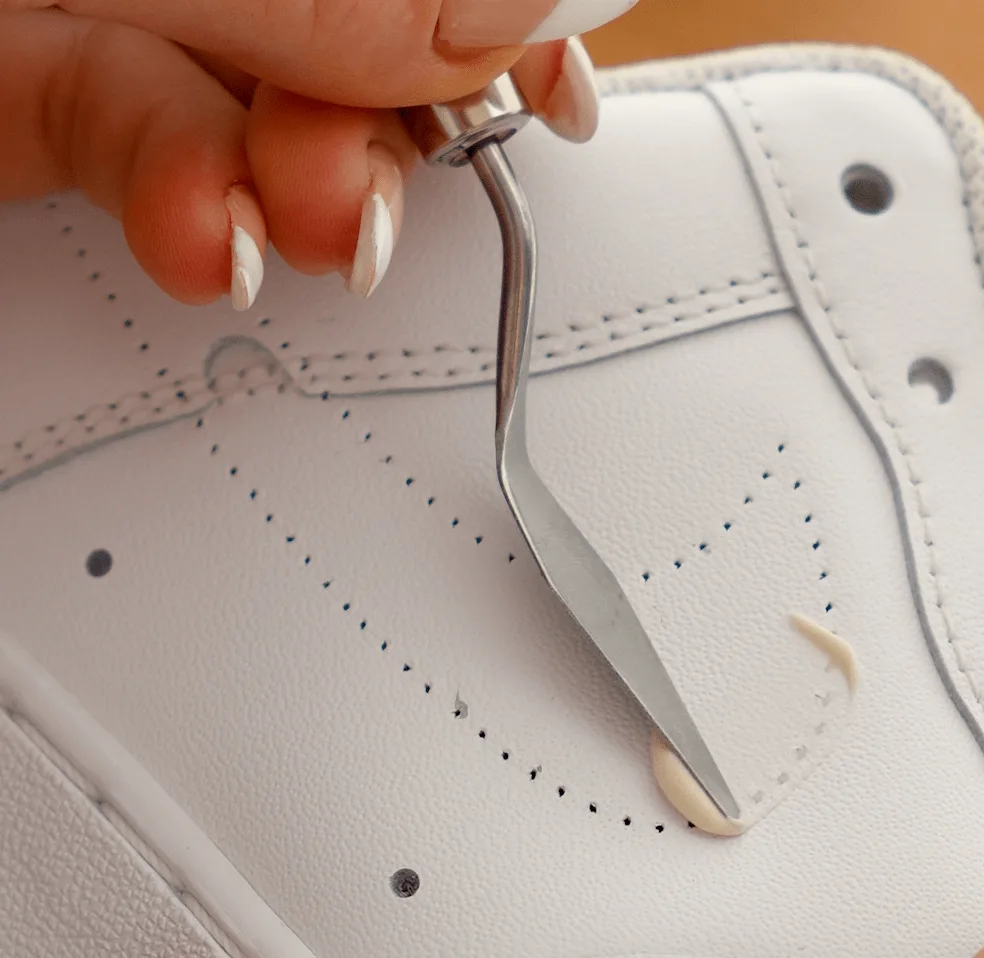
Image source: Bing (Web (fair-use with source credit))
Small Tears (Under ½ Inch)
Clean the surrounding area with upholstery cleaner and let it dry. Trim any loose threads with fine scissors. Apply a thin layer of flexible filler directly into the tear, overfilling slightly so the surface sands flush.
Let it cure for the time stated on the package, usually 20 to 30 minutes, then sand lightly with fine-grit paper. Wipe away dust, apply the color coat, and finish with a grain texture pad if the seat has a pattern.
Medium Tears (½ to 2 Inches)
For medium tears, filler alone won't hold. Slip a backing patch behind the tear so it overlaps the hole by at least a quarter inch. Glue the patch in place with flexible adhesive.
Once that's dry, apply filler over the top, feathering the edges so no raised line shows. Cure, sand, and color match as you would for a small tear. If you rush the cure, sitting pressure will pull the patch free and reopen the tear.
Step-by-Step: Repairing a Torn Cloth Seat
Cloth is the easiest material to fix at home. Start by cutting away dangling threads, then choose your method. Iron-on patches work well for holes under an inch.
Cut the patch slightly larger than the tear, apply it to the backside of the fabric, and press with a warm iron. For a seam split, hand stitch the edges together using a ladder stitch so the thread stays hidden.
One trick from upholstery forums is to seal the fabric edges with a thin layer of flexible adhesive before patching. That stops fraying from spreading after you bond the patch. Cloth tears usually happen on the lower cushion where passenger weight concentrates.
If a booster seat sits in that spot, check the surface after long trips. Repeated pressure from boosted children can wear the fabric thin and turn into a tear.
When You Should Call a Pro Instead of Doing It Yourself
There are three situations where a DIY repair is the wrong call. The first is any tear on or near a side airbag deployment seam. You can't see the internal stitching, and blocking that seam could stop the airbag from opening.
The National Highway Traffic Safety Administration's air bag guidance is clear: don't modify a deployment zone. Professional shops use airbag-compatible materials.
The second is tears longer than two inches. Once the material has split that far, the surrounding layers have likely lost their bonding strength. A shop can replace the entire panel stitch by stitch.
The third is premium materials like Alcantara, real suede, or Nappa leather. Matching their texture by hand is extremely difficult.
If you drive a newer car or one with a lease return inspection, a visible repair can cost you either way. Before you decide, think about side-impact protection and how the seat fits into your family's daily setup. If the damage sits outside a safety zone and the foam is solid, DIY is a perfectly good fix.
You're trading a few hours of work for saving $100 to $300, and in most cases the results are invisible from the driver's seat.
Common Repair Mistakes That Ruin the Finished Job
The most common mistake is skipping the cleaning step. Dirt and skin oils sit between the filler and the seat, killing adhesion. The filler looks set for a week then pops out.
Second is ignoring cure time. Manufacturers list 24-hour cure times for a reason. Sitting on the seat after two hours wipes out the bond.
Another failure we see in aggregate reviews is using rigid filler on a flexing surface. A stiff compound cracks under the load of a human body. Always choose a flexible repair compound for seats.
The last mistake is color mismatch. The dye should be applied in thin layers, not one heavy coat. If the color is off, feather another layer and let it dry.
Rushing that step produces a shiny patch you'll notice every single time you open the door.
Real Costs: DIY Kit vs. Professional Repair vs. Seat Covers
DIY kits: $10, $40. Professional repair: $50, $300. Full seat covers: $100, $500.
If the foam is intact, DIY wins on value. If the foam is crushed, covers won't help.
Seat Covers: A Smart Alternative or a Red Flag?
Covers hide existing damage. They don't fix the foam underneath. On a resale, a fresh cover over a torn seat is a red flag.
Use covers as a temporary fix, not a cure.
How to Make Your Repair Hold Up Long-Term
Condition leather every 3 months with a good leather conditioner. Use UV protectant on vinyl. Keep sharp objects away from the surface.
A little maintenance prevents the next tear.
Your 30-Second Decision Guide
Check the airbag zone first. If it's there, call a pro. Then match material and size.
Small tears get filler. Medium tears get a backing patch. Cloth gets iron-on patch.
Large tears or collapsed foam mean professional help.
Frequently Asked Questions
Can I fix a torn car seat myself?
Yes, if the tear is small, the foam is solid, and the damage isn't in an airbag deployment zone.
How much does it cost to repair a torn car seat?
DIY kits cost $10, $40. Professional repair costs $50, $300. Full seat covers run $100, $500.