Ultimate Guide to How to Get a Car Seat Out of the Car
If you've ever stared at your child's car seat and wondered how to get a car seat out of the car without breaking something, you're not alone. It's one of those tasks that feels like it should take five seconds, until you're wrestling with a sticky latch or a seat belt that won't let go.
There's a right way and a wrong way to do it. The wrong way can damage your seat, your car, or even the safety of your next ride. Under Federal Motor Vehicle Safety Standard 213, every car seat sold in the U.S. has to meet strict crash performance benchmarks, and how you remove and reinstall it matters just as much as how you first installed it.
So let's walk through this the right way, step by step.

Image source: Bing (Web (fair-use with source credit))
Quick Answer
Press the release button on the base. Unhook the LATCH connectors from the lower anchors. Disconnect the top tether if your seat uses one.
Unbuckle the seat belt if you used that instead. Lift the seat out through the door.
Why Removing a Car Seat Is More Than Just Pulling It Out
Many parents assume that once the kid is out, the car seat just pops out too. That's not how it works. A properly installed car seat is meant to stay put during a crash.
That's a good thing, but it also means removal requires you to undo several connections in a specific order.
Get it wrong and you might yank on the wrong part. You could crack the shell, bend a connector, or strip the belt path. Even worse, you might think you've fully disconnected the seat when it's still anchored by the top tether.
Pulling hard then can cause the seat to snap back and hit you or the door frame.
There's another layer here. A loose car seat rolling around in your back seat is a serious safety hazard. In a sudden stop, an unsecured seat can fly forward with immense force.
That's why our research keeps emphasizing the same point: knowing how to get a car seat out of the car also means knowing what to do with it once it's out. It's part of a bigger picture that includes choosing the right position, like the one we explain in our guide to the safest spot for a car seat.
So take a breath. This isn't difficult once you understand what you're working with. The key is to never force anything.
If a connector isn't releasing, you're likely pressing the wrong button or missing a step. That's exactly what we'll cover next.
First Things First: How Car Seats Actually Attach
Before you can remove a car seat, you need to know how it's attached. There are two main ways: LATCH and the vehicle seat belt. Some seats can use either.
Some rely on one exclusively. Your manual will tell you which one your seat uses.
LATCH stands for Lower Anchors and Tethers for Children. It's a system built into most cars made after 2002. Instead of routing the seat belt through the seat, you connect the car seat's hooks to metal anchors buried in the seat crease.
You also attach a top tether from the top of the seat to an anchor behind it, usually on the back of the seat or the vehicle floor.
The seat belt method does what it sounds like. You thread the lap and shoulder belt through the car seat's belt path and buckle it. Then you lock the belt so it holds the seat tightly.
Some seats also use a locking clip to keep the belt from sliding loose.
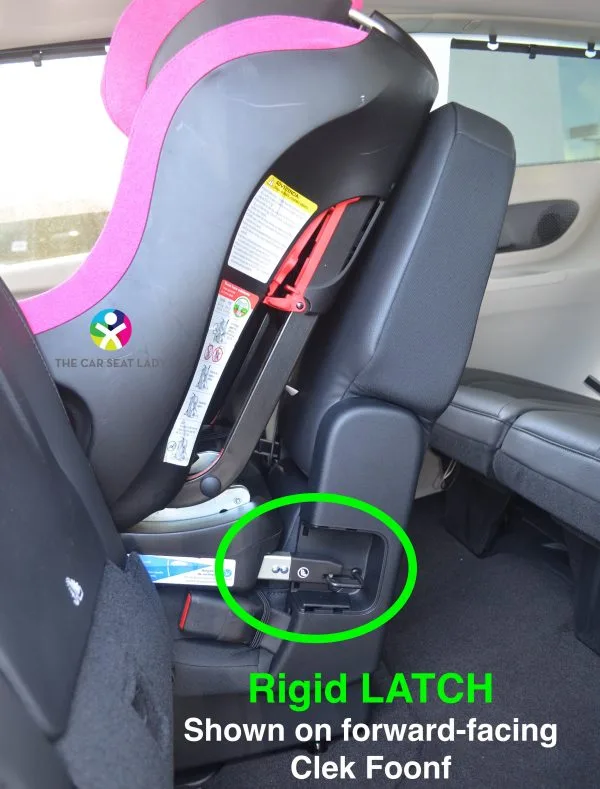
Image source: Bing (Web (fair-use with source credit))
Here's where it gets interesting. Infant carrier seats work differently from convertible seats. An infant carrier has a detachable base that stays installed in the car.
You click the carrier in and out without uninstalling the base. A convertible seat is one solid piece. To remove it fully, you undo the car seat itself from the car.
So the removal process depends on two things: how the seat attaches and whether you're dealing with a base or a one-piece seat. Let's break down those differences with a quick table.
| Attachment Method | What You Unlock | Common on |
|---|---|---|
| LATCH | Release tabs on lower anchor hooks | Most convertible and all-in-one seats |
| Seat belt | Belt latch, lock-off, or locking clip | Many lightweight and older seats |
| Carrier base | Base release button or pull lever | Infant carriers with removable bases |
There's no universal release button across all brands. That sounds obvious, but it's surprising how often parents assume their seat works the same way their friend's seat does. Some bases have a button near the top.
Others have a lever under the front edge. A few require you to press two tabs at once. Your manual is always the final authority.
One more thing to keep in mind: if you're removing a forward-facing seat, you might need to deal with a top tether. That's a strap from the top of the seat to a hook on the car. It's easy to forget, especially since it's often tucked behind the seat.
Forgetting it is one of the most common removal mistakes we see. That brings us to what happens before you even start.
Before You Start: What You Need and What to Read
You don't need tools for this job. No screwdrivers, no wrenches, no special gadgets. What you need is information.
Specifically, the car seat manual and your vehicle's owner's manual.
The car seat manual shows you where the release buttons are and how the belt path works. The vehicle manual shows you where the LATCH anchors are located and how to disengage the seat belt lock. Both matter more than any YouTube video, because your exact model might differ from what you're watching.
Let's talk about the seat belt lock-off. Many modern cars have a switch on the seat belt buckle or shoulder anchor that locks the belt once it's snug. If you used that, you'll need to unlock it before you can pull the belt back out.
The manual will show you where that switch is. Without that step, you'll be pulling on a belt that's physically locked in place.
You should also check the expiration date before moving a seat. Car seats don't last forever. Most expire between six and ten years after manufacture, and the date is stamped on the seat shell or on a sticker underneath.
If your seat is expired, don't bother reinstalling it. Replace it instead. We explain exactly how to read those dates in our article on car seat expiration.
Here's a quick checklist to go through before you touch anything:
- Park on a flat surface.
- Make sure the child is out of the seat.
- Have both manuals within reach.
- Identify whether the seat uses LATCH, seat belt, or a carrier base.
- Check the release button locations.
- Confirm the top tether is accessible.
That last point matters. If the top tether is buried under a pile of groceries or stuffed behind a headrest, you'll need to clear it out first. It's much easier to do that before you're mid-removal and trying to hold the seat with one hand.
You don't need to be a mechanic or a child passenger safety expert to do this. You just need to slow down and pay attention to the details. The manufacturer went to the trouble of printing everything you need to know.
Use it.
Step-by-Step: How to Get a Car Seat Out of the Car
Now for the actual removal. We'll cover the three main situations: a LATCH installation, a seat belt installation, and a carrier base that stays in the car. Each has a different process, so find the one that matches your setup.
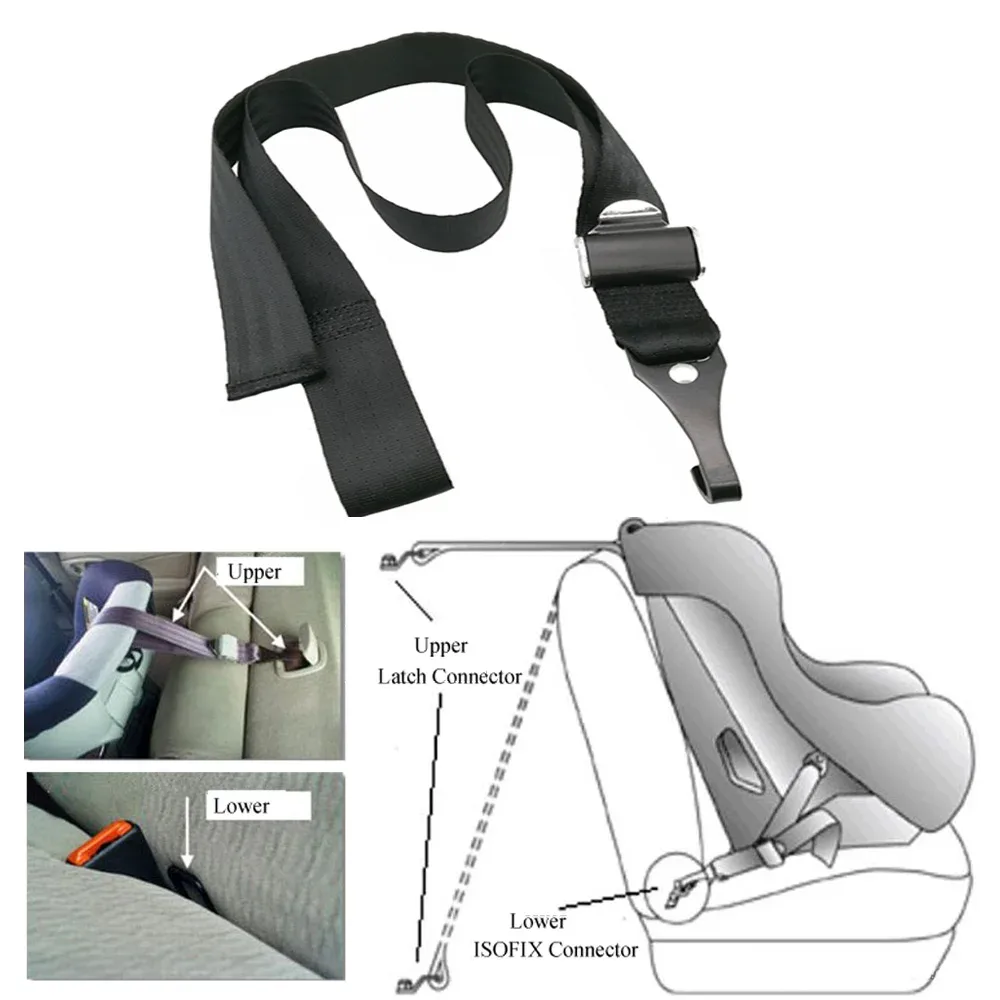
Image source: Bing (Web (fair-use with source credit))
If Your Seat Uses LATCH
- Disconnect the top tether first. Reach behind the seat and unclip the hook from the anchor. If it's a forward-facing seat, this is non-negotiable.
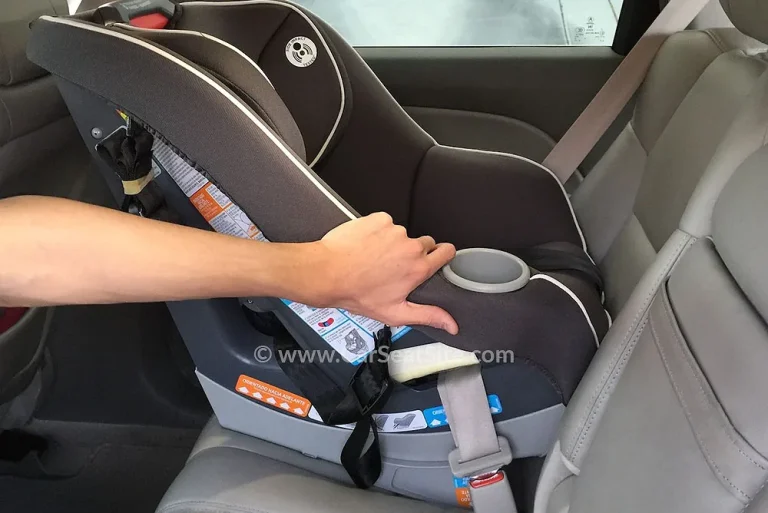
- Find the lower anchor connectors. They're at the bottom of the car seat, usually where the seat crease meets the backrest.
- Press the release button or squeeze the release tabs on each connector. The hook should open and pull free from the metal anchor.
- Tilt the seat back slightly to clear the anchors, then lift it straight up and out.
- If the seat is heavy, hold the harness straps with one hand rather than grabbing the shell. That gives you better leverage.
Some LATCH connectors are rigid. Those have a button right on the connector itself. Others are flexible straps with a hook at the end.
Those use a squeeze-and-pull motion. Either way, you should never have to yank. If it's stuck, check that you're not still clipped to the anchor.
If Your Seat Uses a Seat Belt
- Unthread the seat belt from the belt path if it's already releasing.
- Open the lock-off if your vehicle has one. This is usually a small clamp that snaps over the belt.
- Unbuckle the seat belt.
- If a locking clip was used, slide it off the belt webbing and set it aside in a safe place.
- Pull the belt out of the seat's belt path completely.
- Lift the seat out through the door.
A common hang-up here is the seat belt retracting before you're ready to reinstall. That's fine. You're not reinstalling yet.
Just let it go, and the belt will reel itself back in. The seat should be completely free once the belt is out.
If You Have an Infant Carrier and a Base
This one is the easiest, but people still get it wrong. An infant carrier clicks into its base. To remove the carrier from the base, you press the release handle usually located at the top or on the side.
The carrier lifts straight up. You don't need to uninstall the base unless you're moving to a different car.
To remove the base itself, follow the LATCH or seat belt steps above. The base will have LATCH connectors or a seat belt path just like a convertible seat. Unhook or unthread, then lift the base out.
For a full walkthrough of how these seats change with your child's age, including when it's time to move to a different seat type, check our guide to what car seat to use after an infant carrier.
One more tip. When you lift the seat out, angle it toward you so the door frame doesn't scrape the sides. Swivel it gently as you bring it through.
This is especially important for rear-facing seats in small sedans where the footwell is tight.
After the seat is out, hold onto it properly. Keep the harness buckled and maybe place it on a towel or mat on the garage floor. Never leave it loose on the back seat of your car.
If you do, it becomes a dangerous projectile during any sudden stop.
Common Mistakes That Turn a Simple Removal Into a Safety Risk
You'd think pulling a car seat out is foolproof. Then you see the number of parents who do it wrong. The mistakes aren't usually about strength or skill.
They're about missing a step or rushing the process.
The biggest one is forgetting the top tether. We mentioned it earlier, but it deserves its own spotlight. A forward-facing seat without its top tether disconnected isn't a removable seat.
It's a seat that's still attached at the top. Yanking on it can bend the anchor or damage the tether strap. That's a safety issue if you ever reinstall that seat.
Another common mistake is pressing the wrong release button. Some car seats have both a harness release button and a base release button. If you press the harness release, the straps loosen but the seat stays put.
Then you wonder why nothing happens. Read the manual or look for the icon next to the button.
Let's also talk about the seat belt lock-off. If your vehicle has one and you forget to open it, the belt won't pull through. You'll be tugging on a belt that's genuinely locked.
That's not a problem with your seat. It's a skipped step. Unlock it and everything moves smoothly.
Some parents pull the seat out and then set it on the ground in the driveway. That can get dirt and moisture into the harness system. Or worse, they balance it on the bumper.
If it falls, the shell might crack, and that's something you can't see on the outside. If a car seat has been dropped from height or involved in any impact heavier than a gentle tip, it's time to consider replacements. The National Highway Traffic Safety Administration says that after a moderate or severe crash, car seats should be replaced, even if they look fine.
You can review the official guidance on that at NHTSA's car seat safety page.
There's also the classic mistake of reinstalling it wrong later. You might remove it perfectly, clean the car, then forget whether the belt path was rear-facing or forward-facing. That's why we always suggest snapping a quick photo of the labeled belt path before you uninstall.
It saves you a headache later.
Finally, don't let the seat sit loose in the car while you're driving to a storage spot. Either buckle it into a seat belt or take it inside. Also, keep the harness buckled so the straps don't tangle or get caught in the door.
A little care now prevents bigger problems down the road.
As of 2026, LATCH limits and weight ratings vary quite a bit between brands. So does the release mechanism. That's why the single best piece of advice we can give is to treat every removal like the first time.
Check the manual, find the release, and never force it. That's the difference between a five-minute job and a frustrating one.
What to Do Right After the Seat Is Out: Storing, Cleaning, and Reinstalling
Store the seat indoors in a climate-controlled space. Extreme heat and cold can degrade the plastic shell over time. A damp garage can invite mold into the fabric.
Keep the harness buckled so the straps stay untangled.
Cleaning the seat after removal? Skip the washing machine. Harness straps should never be soaked, since that weakens the webbing.
Use a damp cloth with mild soap on plastic and fabric shells. The manual has model-specific instructions.
Snap a photo of the belt path before removal. That photo is your best friend when you reinstall the seat later. It prevents the classic "which hole does this go through" moment.
When to Call a Certified Child Passenger Safety Technician
Some removals are genuinely tricky. If the seat won't tighten back up after reinstallation, or a release button jams, don't force it. Get a professional involved.
Certified Child Passenger Safety Technicians are trained through Safe Kids Worldwide. They provide free checks at many hospitals, fire stations, and community events. They can also verify that your choice of seating position works with your vehicle's anchor locations.
Call one if you bought a secondhand seat with no manual. Call one if the seat was involved in any crash you're unsure about. It's a free or low-cost way to get expert peace of mind.
Car Seat Expiration, Crash Replacement, and Other Rules Worth Knowing
Car seats expire for a reason. Sun, heat, and moisture weaken the plastic and foam over time. Most manufacturers set the limit between six and ten years from the manufacture date.
That date is stamped on the shell or on a label underneath the seat.
Once the date passes, retire the seat permanently. Don't pass it down to friends, family, or a younger sibling. A weakened shell can perform unpredictably in a crash.
The crash rule matters just as much. NHTSA says to replace any seat after a moderate or severe crash, even if it looks fine. Some manufacturers recommend replacement after any impact at all.
When in doubt, take it out of service and buy a new seat. That approach fits with the broader age-based car seat transitions every parent tracks.
Quick Reference: Removal Steps by Seat Type
Here's the cheat sheet version for busy parents.
Infant carrier: press the release handle, lift the carrier out. The base can stay in the car unless you're switching vehicles.
Convertible seat with LATCH: unhook the top tether first. Press the release tabs on both lower anchor connectors. Lift the seat up and out.
Convertible seat with seat belt: open the lock-off clamp. Unbuckle and unthread the belt. Slide off the locking clip and set it aside.
Every seat has its own quirks. Keep the manual handy, or download a PDF from the manufacturer's website if you misplaced it.
Frequently Asked Questions
Why won't my LATCH connectors release?
Press the release tab while gently wiggling the connector. If it stays stuck, lift the seat slightly to take pressure off the anchor. Then press the tab again.
Still stuck? Check that the seat belt lock-off isn't engaged by mistake.
Can I leave the car seat base installed in the car?
Yes, as long as it's installed properly and you'll use it again soon. The base is secured by LATCH or the seat belt, so it won't move around. If the car will sit unused for weeks, remove and store the base indoors.
How long does it take to remove a car seat?
Two to five minutes once you know the release mechanics. The first try takes longer because you're learning. By the third time, you'll do it without thinking.
Final Check: What a Safe Removal Should Look Like
A safe removal leaves the car seat fully free. No tether strap, no seat belt, no LATCH connector still attached. You should be able to lift the seat out with one hand and feel zero resistance.
Before you move on, give the seat a quick once-over. Check the bottom for any debris or stuck parts. Make sure the harness buckles are clean and ready for next time.
If the seat is going back in the car today, reinstall it with the same care you used originally. Push down firmly at the belt path and tighten until the seat moves less than one inch side to side. Need a refresher on the rules for each age group?
Check our breakdown on forward-facing readiness and booster seat timing. Then buckle everyone up and drive safe.