How to Hold a Car Seat Safely: Step-by-Step Guide
When you hear “how to hold a car seat,” your first thought might be about carrying the infant carrier from the car to the stroller. That’s part of it. But the real meaning, the one that keeps your child safe, is about how the car seat holds your child securely inside the vehicle.
A loose installation or a twisted harness can turn a life-saving device into a serious risk, and most parents don’t realize they’ve made a mistake until a car seat check catches it.
According to CDC data, proper car seat use reduces the risk of infant death in a crash by about 71 percent. That’s the kind of number that makes you stop and pay attention. As of 2026, the safest practice hasn’t changed: you need to get the installation right every single ride.
Let’s walk through what that actually looks like.
Quick Answer
To hold a car seat correctly, start with a rock-solid base installation. Use LATCH or the seat belt. Tighten until the seat moves less than one inch.
Secure your child with a snug harness. The chest clip must sit at armpit level.
What “Holding a Car Seat” Really Means (and Why It Matters)
Holding a car seat isn’t about carrying it by the handle. It’s about locking it into the vehicle in a way that keeps your child restrained during a crash. The seat itself does the holding, not your arm, not the base alone, and definitely not the shopping cart you clipped the carrier onto.
When the seat is installed properly, the energy of a crash transfers to the vehicle frame, not your child. That’s why the National Highway Traffic Safety Administration (NHTSA) emphasizes two main points: less than one inch of movement at the belt path and a harness that passes the pinch test. These aren’t nice-to-haves.
They’re the standard that has saved hundreds of lives every year.

A properly installed seat doesn’t just sit there, it becomes part of the vehicle’s safety system. If it’s loose, the seat can move in a sudden stop, putting your child at risk for head injury or ejection. That’s why the phrase “how to hold a car seat” is really about making sure the car seat holds your child, not the other way around.
The Three Non-Negotiables: Handle, Base, and Harness
Every car seat relies on three critical systems that turn it from a plastic shell into a restraint. If any of them isn’t right, the whole system is compromised.
| Component | Its Job | The Golden Rule |
|---|---|---|
| Carry handle (infant carriers) | Allows you to carry the seat outside the car, and locks it stable during a crash | Must be in the locked travel position when the seat is in the vehicle |
| Base | Anchors the carrier or seat to the vehicle seat with LATCH or seat belt | Must not move more than one inch at the belt path |
| Harness | Holds your child in the seat during a crash, distributing forces across the strongest parts of their body | Must pass the pinch test at the collarbone; chest clip at armpit level |
Each one depends on the others. If the handle is in the wrong position, the carrier might not stay secure in the base. If the base is loose, the harness can’t do its job.
And if the harness is too loose, your child can slip out of the seat during a crash.
How to Position the Carry Handle Correctly (Infant Carriers Only)
If you’re using an infant carrier with a detachable base, the handle has a few built-in positions. There’s usually a carry position (upright, locked for carrying), and one or two “travel” positions (lowered or upright, depending on the brand). The manual will tell you exactly which position is approved for use in the car.
The rule is simple: the handle must be in the locked travel position whenever the seat is installed in a vehicle. In a crash, an unlocked handle can swing forward and strike your child, or it can let the carrier itself twist or become unstable. It’s a small detail that matters enormously.
Some seats also have a position that keeps the handle out of the way for smaller infants. That’s fine, as long as it’s locked. Check the base: most infant carrier bases have a visual indicator or a click sound that tells you the carrier is clicked into the base and the handle is in the right place.
If you don’t hear that click, double-check the handle position before driving.
Installing the Base So It Actually Holds the Seat
A loose base is the most common car seat mistake. Here’s how to get it right every time.
-
Read both manuals first. Every seat and every vehicle is different. The car seat manual tells you which belt path to use. The vehicle manual tells you where the LATCH anchors and tether points are. You need both.
-
Pick the right seating position. The center of the back seat is generally the safest if the seat fits properly and the belt or LATCH works there. But in many cars, the center seat has a lap-only belt, which won’t work for many seats. Check your manual.
-
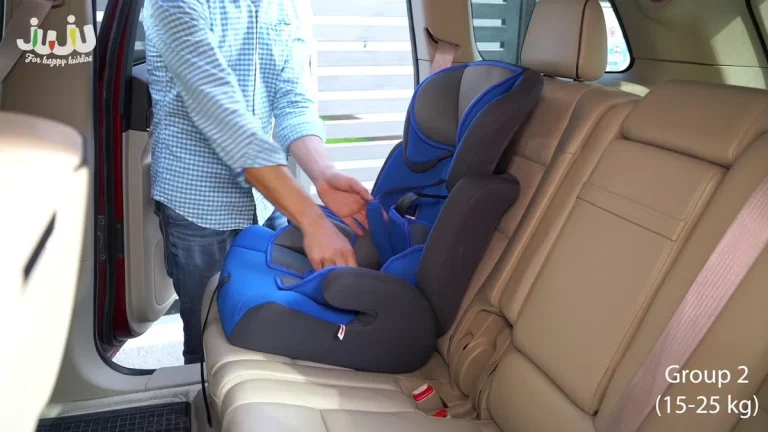
Route the seat belt or LATCH strap through the correct belt path. Rear-facing uses a different path than forward-facing. On a rear-facing base, the belt goes through the slot that’s closest to the child’s feet.
-
Tighten by alternating sides (for LATCH) or by pulling the shoulder belt (for seat belts). Lean your weight into the base as you tighten. You want the base to feel like it’s part of the car, not sitting on top of it.
-
Lock it. With LATCH, the system locks automatically once you pull the strap tight. With a seat belt, you need to engage the locking mechanism, either by fully retracting the shoulder belt (most modern cars) or by using a locking clip (some older vehicles). The manual will tell you.
-
Check movement at the belt path. Grab the base with both hands at the belt path and try to move it side-to-side and front-to-back. It should not budge more than one inch (about the thickness of two stacked dimes).
A well-installed base makes the rest of the process straightforward. If you’re traveling and plan to rent a car seat instead, the same principles apply, though the fit varies by car model and seat style.
Securing Your Child: Getting the Harness Snug and Straight
Even with a perfect base installation, a loose harness defeats the whole purpose. The harness is what actually holds your child in the seat. Here’s what to check every time you buckle them in.
Harness height. For rear-facing, the harness straps must be at or below your child’s shoulders. For forward-facing, they must be at or above the shoulders. If the height is off, the harness won’t do its job in a crash.
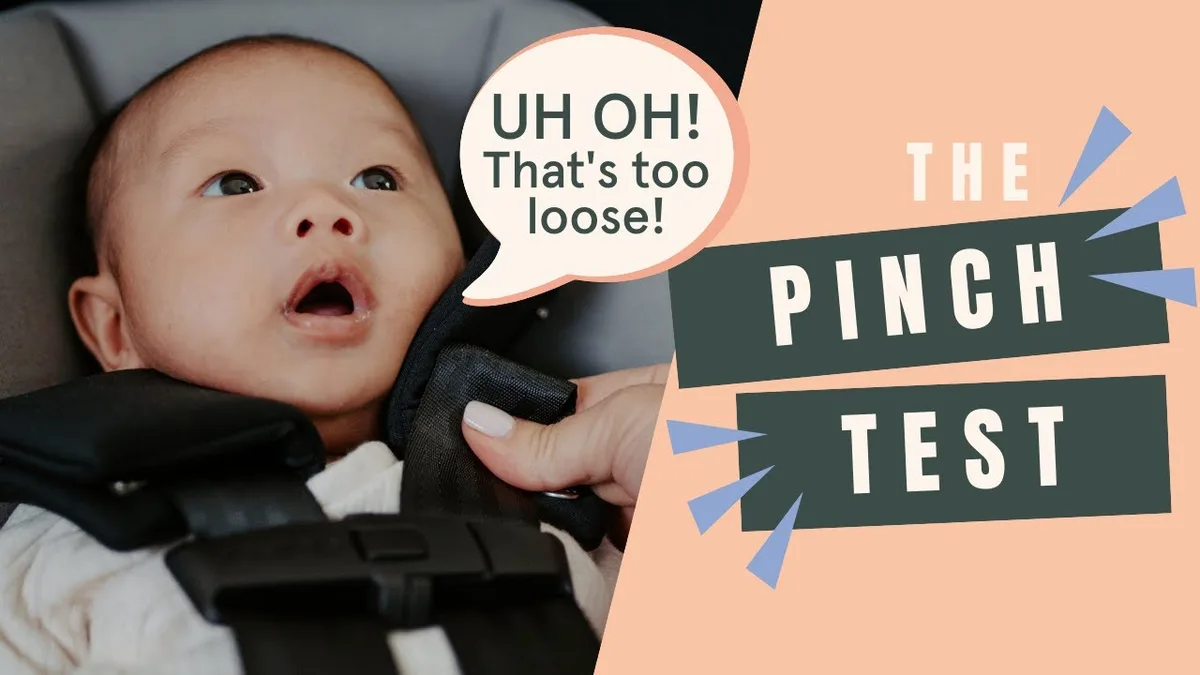
Harness tightness. After you buckle and tighten, perform the pinch test at the collarbone: try to pinch a fold of webbing between your thumb and forefinger. If you can pinch any slack, it’s too loose. The harness should feel like a firm handshake across the child’s body.
Chest clip position. The chest clip should be even with the armpit, not near the belly or the neck. In a crash, a mispositioned chest clip can cause internal injuries.
No twists. Each harness strap should lie flat against your child’s body. Twisted straps concentrate force in a smaller area and can break under stress.
It takes about 30 seconds to check these four points before you start the car. That 30 seconds is the difference between a seat that works and one that looks like it works.
The Pinch Test and the 1-Inch Rule: How to Verify a Safe Install
After you tighten the harness, do the pinch test. Take your thumb and forefinger and try to pinch a fold of webbing at your child’s collarbone. If you can pinch any fabric, the harness is too loose.
It should feel like a firm handshake across their chest.
Some parents worry about squishing the baby. It’s a common concern. But a snug harness is critical.
According to the CDC, correctly used car seats reduce injury risk by more than 70 percent. That snugness is what makes the seat work in a sudden stop.
The one-inch rule applies to the base installation. After you tighten the seat belt or LATCH strap, push the base side-to-side near the belt path. If it moves more than one inch (about the width of two stacked dimes), it’s too loose.
Repeat the tightening process and lean your weight into the base while pulling the strap.
Both checks take less than a minute. But they can save you from a dangerously loose seat.
5 Common Mistakes That Turn a Safe Seat Into a Risky One
Even careful parents slip up on these five points. Here’s what to watch for.
1. Harness straps through the wrong slots. Rear-facing seats need straps at or below the shoulders. Forward-facing needs them at or above.
A mismatch can let your child slide out or put pressure in the wrong place.
2. Chest clip too low. The chest clip belongs at armpit level, not near the belly. In a crash, a low clip can compress the abdomen.
Many newborns are placed with the clip too low because parents think it looks more comfortable.
3. Using LATCH past the weight limit. Lower anchors have a weight limit. It’s usually between 65 and 80 pounds total (child plus seat).
Check the manual. After that, switch to the seat belt.
4. Twisted straps. A twisted harness concentrates force on a smaller area. Run your hand along each strap before buckling.
If you find a twist, feed the buckle through to straighten it.
5. Base not clicked in properly. For infant carriers, you must hear the click that locks the carrier onto the base. Some carriers also have a green indicator.
If you don’t see it, the carrier isn’t secure.
Forward-Facing Seats: The Critical Tether Step Most People Skip
When you switch to forward-facing, the top tether becomes a lifesaver. The tether is the strap that connects the top of the car seat to an anchor in your vehicle. It reduces forward head movement by up to 4 to 6 inches in a crash.
Here’s the problem: many parents don’t attach the tether. A 2013 NHTSA study found that more than 30 percent of forward-facing seats were used without the tether. That’s a huge missed opportunity for safety.
The tether installation is easy. Find the tether anchor in your car (usually behind the rear seat, on the floor, or on the ceiling for SUVs). Hook the tether clip to the anchor.
Then tighten the strap by pulling the loose end. It should feel snug but not so tight that it changes the seat’s angle.
Check your vehicle owner’s manual for exact anchor locations. Some cars have them in unusual places, like the side pillar of the cargo area.
When and How to Use the Seat Without a Base
Infant carriers are designed to work with the base. But you can also install them without the base using the vehicle seat belt. This is common in taxis, rental cars, or when traveling.
The process is straightforward. Route the seat belt through the carrier’s belt guides (check the seat manual for the correct path). Buckle the belt.
Then tighten by pulling the shoulder belt until the carrier is snug. You should not get more than one inch of movement at the belt path.
Some carriers have a built-in lock-off that holds the belt tight. If your seat doesn’t have one, use a locking clip (included with most car seats). The locking clip keeps the belt locked so it doesn’t loosen over time.
If you’re renting a car, you have options. Many rental agencies offer car seats, but the quality can vary. Bringing your own seat and using it without the base is often safer because you control the installation.
The Winter Coat Trap and Other Aftermarket Dangers
Bulky winter coats are a major car seat hazard. A heavy coat compresses in a crash, adding inches of slack to the harness. The result is that your child can be thrown forward or out of the seat.
The “fluff test” is a simple rule: put the coat on, buckle the harness, and tighten. Then take the coat off and check again. If the harness is loose without the coat, the coat is too bulky.
Never use aftermarket products that didn’t come with the seat. That includes strap covers, head supports, body positioners, and seat protectors. These aren’t crash-tested with the seat.
They can interfere with the harness fit or cause the seat to slip sideways. The safest rule is that only the seat and its original parts go between your child and the vehicle seat.
When to Call in a Pro (CPST) for a Hands-On Check
Even after reading every manual and tightening until your arms hurt, you can miss something. That’s where a Child Passenger Safety Technician (CPST) comes in. These are certified professionals who have completed a national training program through the National Child Passenger Safety Board.
A CPST check is free or low cost. You drive to a check event or a fire station. They inspect your installation in about 20 minutes.
They correct mistakes, teach you the right technique, and answer questions.
You should get a CPST check if any of these apply:
- This is your first install with a new seat.
- You switched from rear-facing to forward-facing.
- You bought a different vehicle.
- You moved the seat to a new seating position.
- You’re not sure you got the one-inch rule right.
Many parents think they installed it correctly. CPSTs find errors in more than 80 percent of checks according to aggregate data from check events. That’s not a judgment.
It’s just how complex these systems are.
To find a CPST near you, search online for “car seat check” plus your city. You can also use the NHTSA car seat inspection locator. They’ll walk you through everything and send you home confident.
Your At-a-Glance Safety Checklist for Every Ride
Print this checklist and keep it in your glove box. Run through it every time you buckle your child in.
Before you start the car:
- Base moves less than one inch at the belt path.
- Carry handle is locked in the approved travel position (infant carriers).
- Harness straps are at the correct height for your child’s direction.
- Harness passes the pinch test at the collarbone.
- Chest clip is at armpit level, not on the belly.
- No twists in the harness straps.
- No bulky coat or aftermarket products (strap covers, body positioners) under the harness.
- Forward-facing: tether strap is attached and tightened.
- Seat belt or LATCH is locked, not loose.
- Child’s weight is within the seat’s limits (check sticker on the seat).
Weekly:
- Check expiration date on the seat label. Discard if expired.
- Clean the harness with mild soap and water. Never bleach or soak.
- Inspect for damage: cracks, frayed straps, missing parts, or crash history.
After a crash (even minor):
- Replace the seat according to manufacturer guidelines. Many seats must be replaced after any moderate or severe crash. Check your manual.
If you’re planning a trip and considering seat options, it helps to know what rental agencies offer. Many parents find that bringing their own seat is simpler and safer than relying on a rental company.
Frequently Asked Questions
How tight should a car seat harness be?
The harness should pass the pinch test. After you tighten the harness, try to pinch a fold of webbing at the collarbone. If you can pinch any fabric, it’s too loose.
The harness should feel like a firm handshake across the child’s body.
Can I use a car seat without the base?
Yes, most infant carriers can be installed without the base using the vehicle seat belt. Route the belt through the carrier’s belt guides. Tighten until the carrier moves less than one inch.
Use a locking clip if your seat belt doesn’t lock automatically.
When should a child switch to forward-facing?
The American Academy of Pediatrics recommends rear-facing until at least age 2, but longer is better. Keep your child rear-facing until they reach the maximum height or weight limit of their rear-facing seat. For most convertible seats, that’s 40 to 50 pounds.
How do I know if my car seat is expired?
Check the label on the side or bottom of the seat. It shows the manufacture date and expiration date. Most seats expire 6 to 10 years from the manufacture date.
Expired seats cannot be trusted in a crash and should be destroyed and replaced.
Can I wash the car seat harness?
No. Never submerge the harness straps in water. Clean them with a mild soap and damp cloth only.
Harsh detergents and soaking can weaken the webbing. Always check the manual for cleaning instructions specific to your seat.
What is the LATCH weight limit?
LATCH lower anchors have a weight limit. It’s usually 65 pounds total (child plus seat). Check your car seat manual and vehicle manual.
Once that limit is reached, switch to a seat belt installation with the top tether for forward-facing.