Step-by-step: How to Get Glitter Out of Car Seats
You've vacuumed the car twice, and glitter still shows up on the seats like a stubborn reminder. If you're searching for how to get glitter out of car seats, you're not alone. It burrows into fabric and refuses to let go.
The good news, there's a method that actually works.
Craft glitter particles range from about 0.05 mm to 1 mm in size. That's small enough to slip deep into a seat's weave and cling there with static electricity. As of 2026, the most effective removal processes rely on understanding that static charge rather than fighting it.
Here's how to tackle it step by step, no matter what your seats are made of.
The Problem: Why Glitter Feels Impossible to Remove
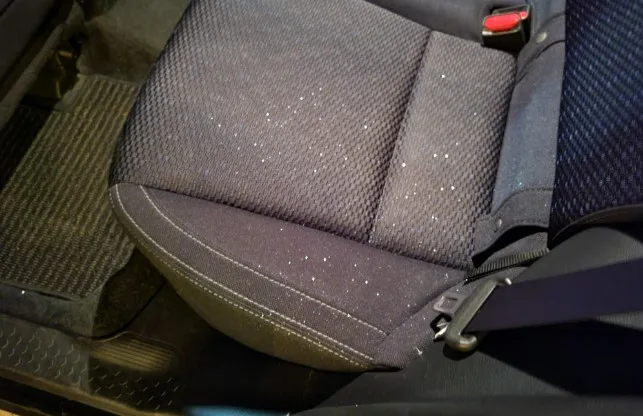
Glitter doesn't act like normal dirt. It's feather-light, so you'd think a vacuum would suck it right up. Instead, it flies around, settles right back down, and sometimes even wedges itself deeper into the fabric.
Here's what's working against you:
- Static cling. Most craft glitter is plastic-based, which holds static charge well. That charge makes it stick to fibers the way a balloon sticks to your hair.
- Flat, sharp shapes. Glitter particles are tiny, flat disks. They catch on the loops and threads in cloth upholstery like tiny fishhooks.
- Small size. At 0.05 mm, fine glitter can slip below the surface of woven fabric. Once it's down there, surface vacuuming never touches it.
- Seat texture. Smooth leather holds glitter loosely. But cloth, velvet, and suede give it thousands of places to hide.
So the real challenge isn't just picking up the glitter you can see. You have to get the glitter that's already sunk into the seat. That's why the method matters more than the effort.
The Short Answer: What Actually Works
You need three tools working in sequence. Vacuum first to grab loose glitter. Then a dry rubber glove to pull static-charged glitter up to the surface.
Finally, wide tape or a lint roller to trap the stubborn specks that remain.
The key is order. Don't just start dabbing tape onto compacted glitter. You'll press it deeper.
Instead, work in layers:
- Vacuum the seat thoroughly with a brush attachment.
- Rub the seat with a dry rubber glove in one direction to lift glitter.
- Press tape or a lint roller over the affected area. Use a dabbing motion, not dragging.
- Repeat until the tape comes up clean.
That's the core strategy. The exact version depends on your seat material, which we'll get to in a moment.
Before You Start: What You Need (and What You Can Skip)
Don't run out and buy a special cleaning kit. Most of what you need is already in your house. A few items you might think will help will actually make things worse.
Tools that matter
| Tool | Why it helps |
|---|---|
| Vacuum with brush attachment | Lifts loose glitter without scattering it everywhere |
| Dry rubber glove | Pulls static-charged glitter out of the fabric weave |
| Wide packing tape | Traps glitter on surfaces without pushing it in |
| Lint roller | Quick option for smooth surfaces and leather |
| Flashlight | Helps you spot glitter you missed in normal light |
Tools that waste your time
- Wet microfiber cloth on fabric seats. Water makes plastic glitter sticky. Wetting it can press it deeper into the weave.
- Compressed air. It blows glitter into every crack, including seat tracks and the gap between the seat and console.
- Standard sponges. They push glitter around and often leave it embedded.
- Wax or adhesive putty. These pick up glitter but also leave sticky residue that attracts dust.
Stick with dry methods first. Moisture is a last resort, and only for leather.
How to Get Glitter Out of Car Seats (By Material)
Your seat fabric changes everything. Cloth traps glitter deep in its loops. Leather holds it on the surface.
Mixed materials need a hybrid approach. Here's how each one breaks down.
Method 1: Cloth and Fabric Seats
Cloth seats are the hardest to deal with. The weave gives glitter plenty of places to hide, and static cling does the rest. But the process is still manageable.
Start by brushing the area with a soft-bristled brush or your hand to loosen surface glitter. Then vacuum with a brush attachment, using slow passes in one direction. This prevents glitter from flying into the air.
Next, put on a dry rubber glove. Rub the seat firmly in one direction for about 30 seconds. The static from the glove pulls glitter up from the depths of the fabric.
You'll see it lift to the surface.
Finish with wide packing tape. Press it onto the fabric, then peel it off. Don't drag it.
Repeat until no glitter comes up. A flashlight helps you spot any stragglers before you wrap up.
Method 2: Leather and Vinyl Seats
Leather is far easier because glitter has nowhere to hide. It sits on the surface, waiting to be picked up. The main risk is scratching the finish with abrasive tools.
Use a vacuum with a soft brush attachment first. Then press a lint roller or tape over the glitter. A dry rubber glove also works well, just rub gently.
If you need a final wipe, use a barely damp microfiber cloth. Avoid soaking the leather. Too much moisture can damage the finish, especially on unsealed leather.
For regular maintenance, proper leather care keeps the surface smooth and less clingy. That's worth reading up on if you want your seats to stay in good shape.
Method 3: Mixed Materials or Heated Seats
Some seats have cloth centers with leather bolsters. Others carry expensive wiring for heated seating. Both need a careful hand.
For mixed materials, use the cloth method on the cloth and the leather method on the leather. Treat each zone separately so you don't push glitter from one surface into the other.
For heated seats, avoid using too much water. Moisture can seep into seams and reach the heating elements. Stick to dry tape and rubber gloves.
Also check your owner's manual before using any liquid. Some manufacturers give specific cleaning instructions, and following them prevents warranty issues.
Which Removal Tool Is Best? A Side-by-Side Comparison
You don't need every tool in the drawer. You need the right one for the job. Here's a quick breakdown based on how each tool performs on common seat materials.
| Tool | Best for | Effectiveness | Risk level |
|---|---|---|---|
| Vacuum with brush | Cloth seats, loose glitter | High for visible glitter, low for embedded | Very low |
| Dry rubber glove | Cloth and leather | High, especially after vacuuming | Low, if gentle |
| Packing tape | Leather, smooth surfaces | Very high for surface glitter | Low |
| Lint roller | Touch-ups, quick cleanouts | Medium, works best on smooth areas | Low |
| Damp microfiber cloth | Leather, vinyl | Medium, removes residue | Moderate on leather |
The verdict: start with a vacuum, then move to the rubber glove. Tape is your finishing move. That combination covers every seat type without risking damage.
You might also notice that regular cleaning keeps glitter from settling so deep. Routine seat upkeep, like vacuuming and conditioning, helps. If you're unsure how to care for leather seats without ruining them, there's a good guide on conditioning that explains what to look for in a product.
Before you grab any detergent, double-check the basics of your car seat's expiry timeline. Cleaning products can wear down plastic shells over time, so you want to know exactly how old your seat is and when it stops being safe to use. The same applies to seat positioning.
If you have a growing child, you might be wondering whether it's time to move them to a booster or adjust the forward-facing setup. Those decisions matter just as much as spotless upholstery.
Finally, the safest spot for a car seat is something every parent should confirm, especially after a deep cleaning session. If you ever install the seat again, check where it sits best. The safest placement is usually the center of the back row, but there are exceptions.
And if you're cleaning a seat because your child had an accident, remember to review car seat safety guidelines from the National Highway Traffic Safety Administration to make sure the seat still meets current standards.