
When Can You Change Car Seat to Front Facing? Guide
It’s tempting to flip that car seat around the moment your toddler’s legs start touching the backseat. That’s the most common reason parents ask when can you change car seat to front facing. But the timeline isn’t about comfort, complaints, or even your state’s legal minimum.
The honest answer is more specific than you’d think. You should keep your child rear-facing until they physically outgrow the seat’s rear-facing limits, which often lands somewhere between age 3 and 5. As of 2026, the American Academy of Pediatrics continues to recommend extended rear-facing because the data is overwhelmingly clear: it’s dramatically safer.
Let’s walk through exactly what “outgrowing” means, how to measure it, and when the switch is genuinely safe.
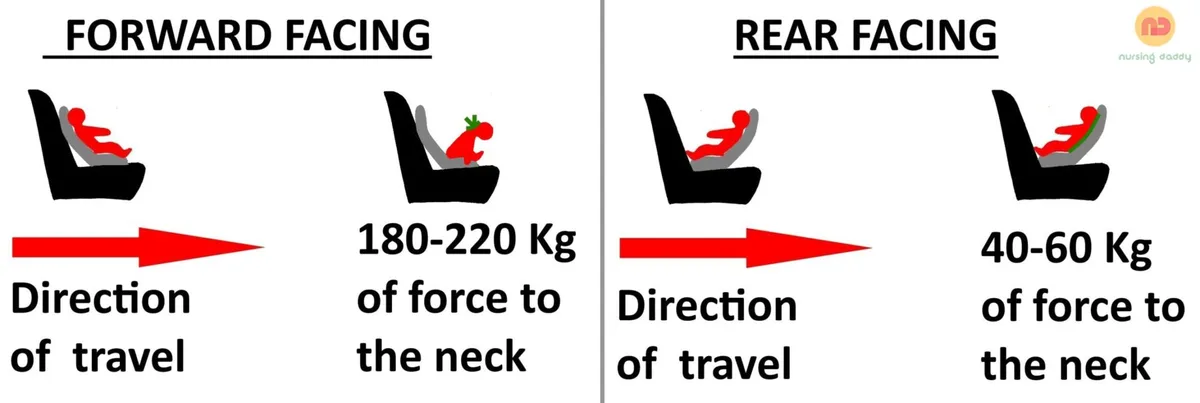
Image source: Bing (Web (fair-use with source credit))
Quick Answer
You can change your car seat to front-facing when your child has outgrown the rear-facing height or weight limit on the seat’s label. That’s rarely at age 1 or 2. Most convertible seats rear-face to 35, 50 pounds.
Many kids hit that limit between ages 3 and 5. The legal minimum is never the safest target.
Why Rear-Facing Is Safer (And Why Experts Pushed the Guidelines)
The physics here are simple. A rear-facing car seat cradles the head, neck, and spine across the entire shell of the seat. When a frontal crash happens, the force spreads evenly across that rigid backrest.
A forward-facing seat catches the child by the harness straps, and the head and neck whip forward with nothing to stop them.
Think of it like catching a falling egg. Rear-facing is a padded box catching it flat. Forward-facing is your open palm trying to stop it mid-air.
The numbers back this up. Research published by the American Academy of Pediatrics shows children under age 2 are roughly 75% less likely to die in a crash when riding rear-facing. Other studies suggest the protective benefit extends well beyond that age.
The leg-touching concern is the biggest myth in car seat safety. Toddlers naturally bend their legs. They sit cross-legged, tuck their feet up, and lean them against the seatback.
That position is comfortable for them and completely safe for their developing hips and knees. Orthopedic surgeons confirm that rear-facing does not increase the risk of leg injuries. In fact, forward-facing positions extend the legs straight out, which can actually cause more lower-extremity injuries in a crash.
This is why the AAP updated its policy in 2018 and continues to refine it. The recommendation reads clearly: keep children rear-facing to the maximum height or weight allowed by the seat manufacturer. Not until they hit a birthday.
Not until they complain. Until the seat says stop.
The Two Limits You Must Check Before Turning: Weight and Height
Both limits matter equally. Most parents check weight and stop there. But height is what most kids actually outgrow first.
The weight limit is printed right on the car seat label, usually on the side near the harness adjuster. It’s also in the manual. You’ll see numbers like “Rear-facing: 5, 40 lbs” or “Rear-facing: 5, 50 lbs.” Once your child hits that number, they must turn forward-facing if the seat doesn’t rear-face any higher.
The height limit works differently. For rear-facing, the rule is the 1-inch rule. Measure from the top of your child’s head to the top of the seat shell.
If there’s less than one inch of shell above their head, they’ve outgrown it. This is critical because the shell needs to absorb and distribute crash forces over the head and neck. If the head is above the shell, those forces go directly to the neck.

Image source: Bing (Web (fair-use with source credit))
Here’s where parents get confused. A convertible seat has two sets of harness slots. Rear-facing, the harness straps sit at or below the child’s shoulders.
Forward-facing, they need to be at or above the shoulders. When you turn the seat, you must move the straps up. That’s part of the forward-facing installation, and it changes which limits apply.
The label also lists the forward-facing limits. A typical convertible seat forward-faces from 22, 65 pounds and up to 49 inches tall. That’s the next set of numbers.
| What Limits Apply | Rear-Facing | Forward-Facing |
|---|---|---|
| Typical weight range | 5–50 lbs | 22–65 lbs |
| Harness strap position | At or below shoulders | At or above shoulders |
| Outgrow height rule | Less than 1 inch of shell above head | Ears above the top of the seat shell |
| Minimum child age | Birth | 1 year (by law), 2+ years (by best practice) |
A child progresses through three distinct phases in a convertible seat. Rear-facing from birth to outgrowing, forward-facing with a harness, then booster mode. Understanding that sequence helps you plan ahead without rushing.
What It Actually Looks Like in Real Life: Typical Ages and Seat Numbers
Real-world numbers help. Not every kid hits the same limit at the same time. Weight and height percentiles vary widely, and that’s fine.
Let’s look at a common seat. Take a convertible seat with a 40-pound rear-facing weight limit and a 40-inch rear-facing height limit. An average toddler at the 50th percentile weighs about 40 pounds at age 4.
They’d hit the height limit slightly earlier, around age 3.5. That’s a typical timeline.
Now take a seat with a 50-pound rear-facing limit. The same average child wouldn’t outgrow it until age 5 or later. Tall kids might outgrow the height limit sooner.
Petite kids might ride rear-facing until kindergarten. Both scenarios are completely normal.
The key is that you don’t decide based on age. You decide based on the label and the measuring tape. Some parents complain that their 2-year-old’s legs are squished.
That’s not a reason to turn. The child is saying nothing; they’re just sitting criss-cross or flopping their feet over the sides. They do not feel pain.
They do not feel trapped.
It’s also worth noting that some convertible seats are designed specifically to keep kids rear-facing longer. Seats with higher shell heights and higher rear-facing weight limits make extended rear-facing easier. Other seats have lower limits.
Always read the manual, because even two seats from the same brand can have different rear-facing caps.
For a deeper dive into this topic, check out the guidance on turning the car seat around to see how the age question shakes out in practice.
Step-by-Step Guide: How to Install a Forward-Facing Car Seat Safely
When the day comes, the installation requires more than just flipping the seat around. There’s a specific sequence that keeps your child safest. Follow these steps carefully.
Step 1: Confirm your child meets the seat’s forward-facing minimums. That’s at least 1 year old, at least 20 pounds, and able to sit upright unassisted. Medical best practice says 2 years old or older. The more conservative, the better.
Step 2: Move the harness straps to the forward-facing slots. Look at the seat back. There are multiple slots. For forward-facing, the shoulder straps must sit at or slightly above your child’s shoulders.
Reach behind the seat to rethread the straps through the correct slot openings. Each manufacturer has a slightly different rethread system, so pull the manual out.
Step 3: Uninstall the seat from rear-facing mode. Unbuckle the LATCH connectors or the seat belt. Remove the seat from the vehicle. You’ll reinstall it in a forward-facing position from scratch.
Step 4: Install with LATCH or the seat belt. Both methods are safe when done correctly. The choice often comes down to weight. Check your vehicle’s manual for the LATCH lower anchor weight limit.
Most vehicles cap it at 40, 65 pounds combined child and seat weight. Once you pass that cap, switch to the seat belt.
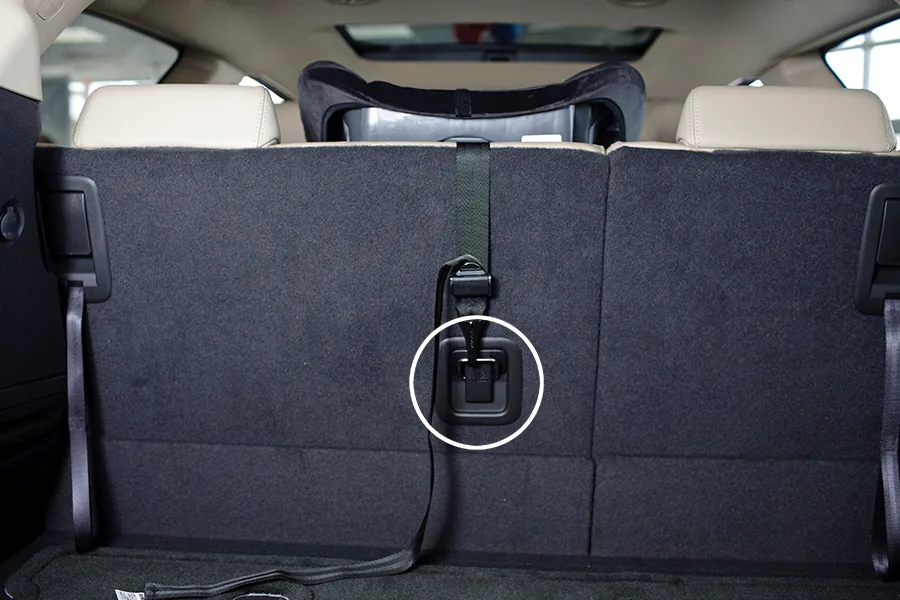
Image source: Bing (Web (fair-use with source credit))
Step 5: Attach and tighten the top tether. This is non-negotiable. The top tether reduces forward head movement by up to 6 inches in a crash. Find the tether anchor in your vehicle, usually on the rear shelf, the back of the seat, or the cargo floor.
Hook the tether strap onto the anchor and pull the adjuster tight.
Step 6: Check for tightness. Grab the seat at the belt path and give it a firm tug. The seat should not move more than 1 inch side-to-side or forward. If it moves more, press your knee into the seat, shift your weight, and tighten the belt before testing again.
Step 7: Position the chest clip and harness. The chest clip goes at armpit level. The harness straps should be snug enough that you cannot pinch a fold of strap between your fingers. No thick winter coats, no bulky snowsuits.
Dress the child in thin layers and add a blanket on top if needed.
Step 8: Double-check the angle. Forward-facing seats sit more upright than rear-facing ones. Many seats have a built-in level indicator. Adjust the base recline so the indicator falls within the forward-facing zone.
Too much recline weakens the harness angle.
The first ride after installation should be short. Listen for rattles. Watch how the child sits.
Most kids will complain once about the new position, then settle in. The average harness check takes about 10 minutes, and it’s worth doing every time you switch vehicles. Review the specific forward-facing car seat requirements before you start so you don’t miss a step.